
Introduction
In this fourth installment of our Fortinet ZTNA series, we delve into ZTNA access proxy server types and how each is applied in our Proof of Concept (PoC).
The ZTNA server defines the access proxy VIP and the real servers that clients connect to. Once configured, client requests are redirected to the access proxy VIP, with authentication mechanisms such as SAML layered on top.
ZTNA supports multiple HTTP and SAML authentication methods.
PoC Scenario
In our PoC, we need to grant access to:
- Two web servers via HTTPS (TCP 443)
- One RDP server via TCP 3389
- One SSH server via TCP 22
To achieve this, we configure three types of ZTNA proxies:
ZTNA HTTPS Access Proxy
The FortiGate HTTPS access proxy functions as a reverse proxy for web servers, forwarding client connections while enforcing authentication and security policies.
How It Works:
- The web server address resolves to the FortiGate access proxy VIP.
- FortiGate proxies the connection, authenticates the device, and enforces security policies.
- The user is prompted to present an endpoint certificate, validated against FortiClient EMS.
Configuration Example
For our PoC, we use FortiGate proxy VIPs:
- aboodshouse.fortiddns.com:8443
- aboodshouse.fortiddns.com:9443
The equivalent CLI configuration for two web servers:
config firewall access-proxy
    edit "ABOOD-DC"
        set vip "ABOOD-DC"
        set client-cert enable
        config api-gateway
            edit 1
                config realservers
                    edit 1
                        set ip 192.168.5.100
                    next
                end
            next
        end
    next
end
FG-ABOOD-DC-WAN (ABOOD-DC) # next
FG-ABOOD-DC-WAN (access-proxy) # edit ABOOD-DC2
FG-ABOOD-DC-WAN (ABOOD-DC2) # show
config firewall access-proxy
    edit "ABOOD-DC2"
        set vip "ABOOD-DC2"
        set client-cert enable
        config api-gateway
            edit 3
                config realservers
                    edit 1
                        set ip 192.168.2.222
                    next
                end
            next
            edit 2
                set service samlsp
                set saml-server "azure-saml"
            next
        end
    next
end
FG-ABOOD-DC-WAN (ABOOD-DC2) # end
Key notes
- The certificate “aboodfwcert” is issued by a trusted CA and used for the access proxy.
- The second web server requires SAML authentication, adding an extra layer of security.
ZTNA TCP Forwarding Access Proxy
The FortiGate TCP forwarding access proxy enables secure tunneling of TCP-based protocols such as RDP, FTP, and SMB.
How It Works:
- The proxy forwards TCP traffic to the target server.
- The connection is tunneled over HTTPS between the client and FortiGate.
- FortiGate enforces user and device authentication before granting access.
- Additional security posture checks (LDAP, RADIUS, SAML) can be applied.
Configuration Example
For our PoC, we configure one RDP server (TCP 3389) via the FortiGate proxy VIP aboodshouse.fortiddns.com:7443 :
config firewall access-proxy
    edit "ABOOD-DC3"
        set vip "ABOOD-DC3"
        set client-cert enable
        config api-gateway
            edit 1
                set url-map "/tcp"
                set service tcp-forwarding
                config realservers
                    edit 1
                        set address "Windows_Server"
                        set mappedport 3389
                    next
                end
            next
            edit 2
                set service samlsp
                set saml-server "azure-saml"
            next
        end
    next
end
ZTNA SSH Access Proxy:
The FortiGate SSH access proxy secures and controls access to SSH servers.
How It Works:
- FortiGate acts as a reverse proxy for SSH traffic.
- It validates the SSH host key to verify the server’s identity.
- If the host key matches, the connection is established. Otherwise, it is denied.
Advantages Over TCP Forwarding:
- Enables SSH deep inspection.
- Performs optional host key validation.
- Enforces user and device trust context.
- Supports one-time authentication for both FortiGate and the SSH server.
Configuration Steps
For our PoC, we configure one server access over SSH (TCP 22) via the FortiGate proxy VIP aboodshouse.fortiddns.com:6443 :
- Locate the public key files in the SSH server, choose the public key file based on the hash type ( in this case, ECDSA) , and show its content with cat utility

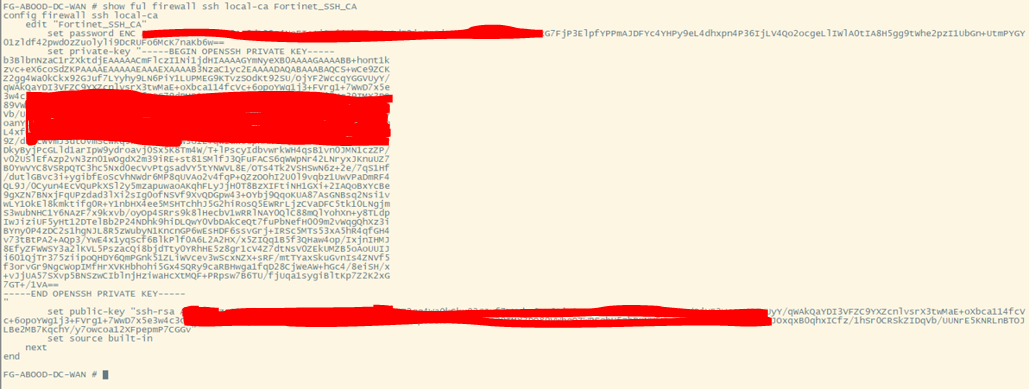
- Retrieve the Fortigate CA’s public key from the Fortigate:
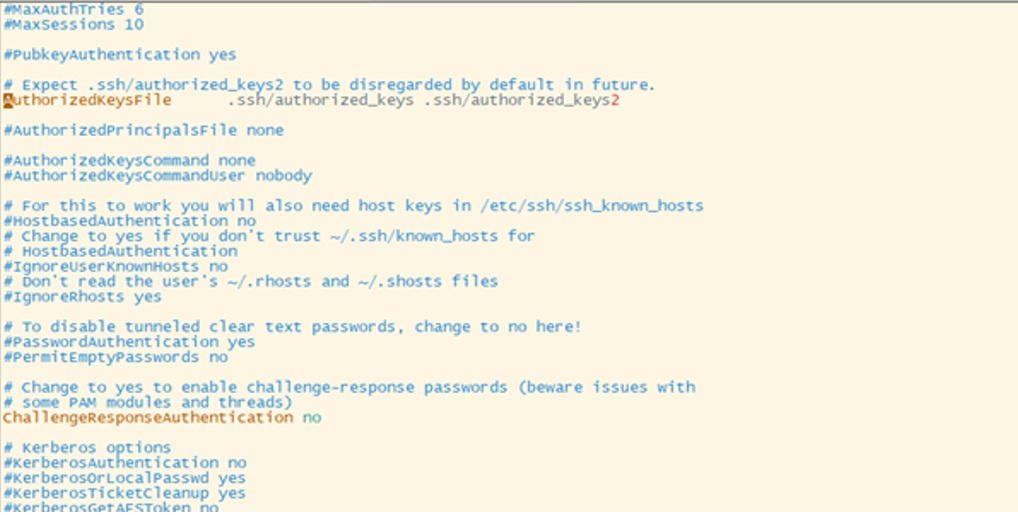
- On the Linux server, enable the SSH service to use the authorized_keys file:
- Locate and edit /etc/ssh/sshd_config file.
- Ensure that the AuthorizedKeysFile line is not commented.
- Allow remote SSH log in with certificate authentication and principal name:
- Locate the accounts authorized_keys file in the ~/.ssh directory ( if the directory doesnt exist, create it with mkdir ~/.ssh)
- Create an entry containing following keywards and add them the authorized_keys file . In POC example ( using echo ‘cert-authority,principals=“abooda” ssh-rsa ********’ » authorized_keys) -> cert-authority: Indicates entry us used in certificate authentication by validating the certificate using the public key provided in this entry. -> principals=“abood” : indicates the user that must match with the username embedded in the SSH certificate. -> ssh-rsa **** : indicates the Fortigates CA’s public key that is used to validate the SSH certificate


- Restart sshd service per above.
- When a user connects from a SSH client using
@ , sshd will locate the authorized_keys file in the directory /home/ /.ssh/authorized_keys. - If the authorized_keys is not in that directory, authentication will fail on the SSH server side.
- If you suspect that authentication is failing on the SSH server, use the following commands to manually start sshd in debug mode to troubleshoot:
- When a user connects from a SSH client using
$ sudo systemctl stop sshd
$ /usr/sbin/sshd -ddd -p 22
- Create a new VIP on Fortigate to allow access to the SSH proxy ( In POC: aboodshouse.fortiddns.com:6443)
config firewall vip
    edit "ABOOD-DC4"
        set type access-proxy
        set extip 14.137.208.29
        set extintf "NBN"
        set server-type https
        set extport 6443
        set ssl-certificate "aboodfwcert"
    next
end
- Create the address object of the SSH server on the Fortigate Firewall:
config firewall address
    edit "ubuntu-docker-2"
        set subnet 192.168.2.3 255.255.255.255
    next
end
- Configure the host-key that will be used to authenticate the SSH server. The public key was retrieved when we configured the Linux SSH server ( Step 1).
config firewall ssh host-key
    edit "spk-ubuntu-docker-2"
        set type ECDSA
        set usage access-proxy
        set public-key "AAAAE2VjZHNhLXNoYTItbmlzdHAyNTYAAAAIbmlzdHAyNTYAAABBBBBooCYd+9j47rfY8lFYOqrztZPL8pvpHQRAWmOHa2kjuq8wCcJRiWq3MQxGXKjWsVWxCHVY5HLaMEyd1FySVG4="
    next
end

9.	 Configure the access proxy SSH client certificate ( A CA certificate is assigned to sign the SSH certificate that will be used in the SSH authentication. The SSH certificate will have the username embedded in the certificate principal).
config firewall access-proxy-ssh-client-cert
    edit "ubuntu-docker-2-access-proxy-ssh-client-cert"
        set source-address enable
        set auth-ca "Fortinet_SSH_CA"
    next
end
- Configure the access proxy server settings:
config firewall access-proxy
    edit "ABOOD-DC4"
        set vip "ABOOD-DC4"
        set client-cert enable
        config api-gateway
            edit 1
                set url-map "/tcp"
                set service tcp-forwarding
                config realservers
                    edit 1
                        set address "ubuntu-docker-2"
                        set type ssh
                        set ssh-client-cert "ubuntu-docker-2-access-proxy-ssh-client-cert"
                        set ssh-host-key-validation enable
                        set ssh-host-key "spk-ubuntu-docker-2"
                    next
                end
            next
            edit 2
                set service samlsp
                set saml-server "azure-saml"
            next
        end
    next
end
Conclusion
ZTNA access proxies provide a flexible and secure method for controlling access to protected resources. By leveraging HTTPS, TCP forwarding, and SSH access proxies, organizations can:
- Ensure strong authentication and identity validation.
- Secure access to web, RDP, and SSH services.
- Maintain zero-trust security principles.